How to Repair a Sleeping Bag in Under 30 Minutes
A sleeping bag repair usually comes down to three core fixes: patching torn fabric, replacing or restoring lost insulation, and mending a broken zipper. This guide covers damage diagnosis, the right tools, step-by-step repairs, and prevention tips to restore warmth and extend your bag’s life. I share the exact methods I use on my own bags after two decades of camping and trail work around Rangamati, Bangladesh.
Sleeping bag damage falls into four common problems: small fabric rips, seam leaks, zipper failures, and insulation loss. Use repair tape or fabric patches for tears, seam sealant for seams, zipper repair kits for sliders, and down refills for cold spots. Clean the area first, then apply each fix while the fabric stays dry.
What Damages a Sleeping Bag Most Often
Most sleeping bag damage comes from five sources: tent floor abrasion, zipper strain, spark burns, moisture rot, and improper storage compression. A ripstop nylon shell resists snags, yet sharp gear edges still cut the fabric. Down clumps when wet and loses loft. Synthetic insulation breaks down after repeated compression cycles.
I learned this the hard way after storing a damp bag inside its stuff sack for two weeks during monsoon humidity. If your bag smells musty or feels flat, moisture damage started before the visible tear appeared. You can find more details on proper gear drying in my guide on drying wet camping gear at the campsite.
When to Repair a Sleeping Bag vs Replace It
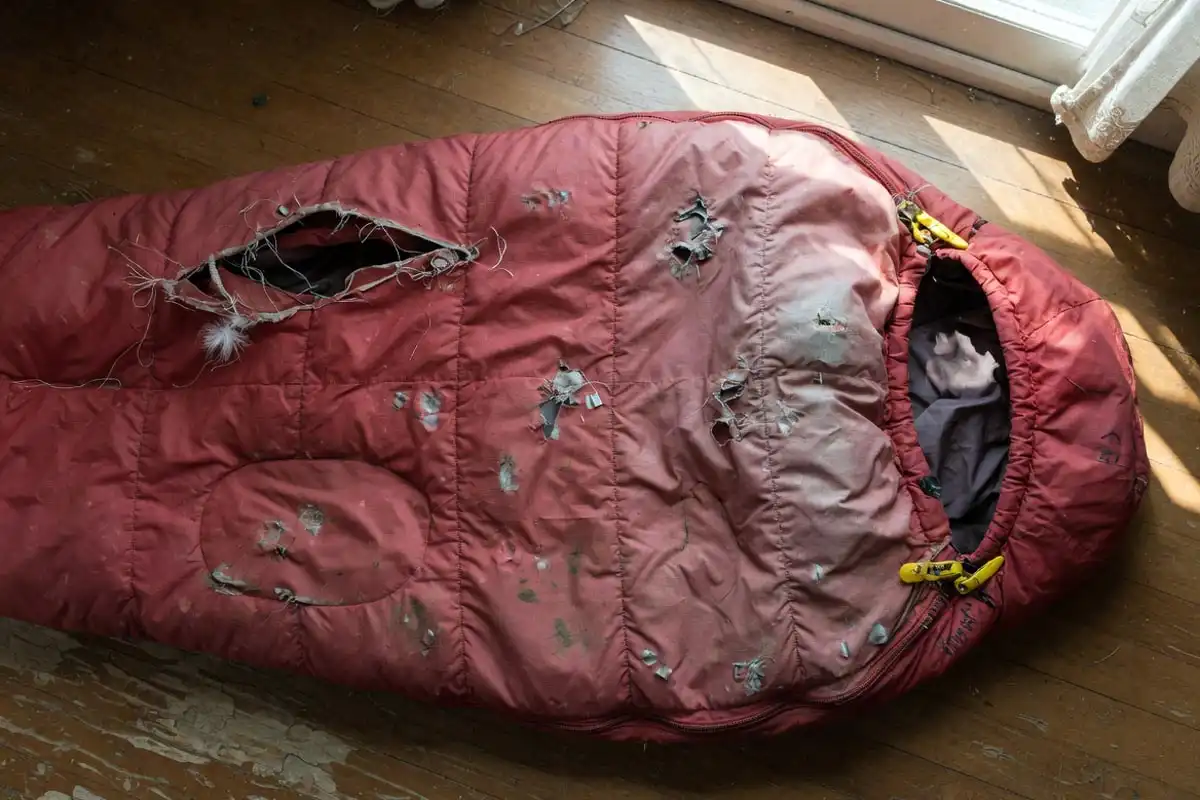
Repair the bag when the damage covers less than 10% of the shell or affects one zipper. Replace it when the insulation has lost 40% or more of its loft, or when the fabric delaminates in multiple spots. A single 2-inch tear costs around $5 to patch. A new quality bag runs $150 to $400.
Replacement makes sense when:
- The shell fabric tears with light pressure
- Down leaks from three or more places
- The zipper track has missing teeth beyond one slider width
- The bag fails a warmth test at its rated temperature
Tools and Materials You Need to Repair a Sleeping Bag
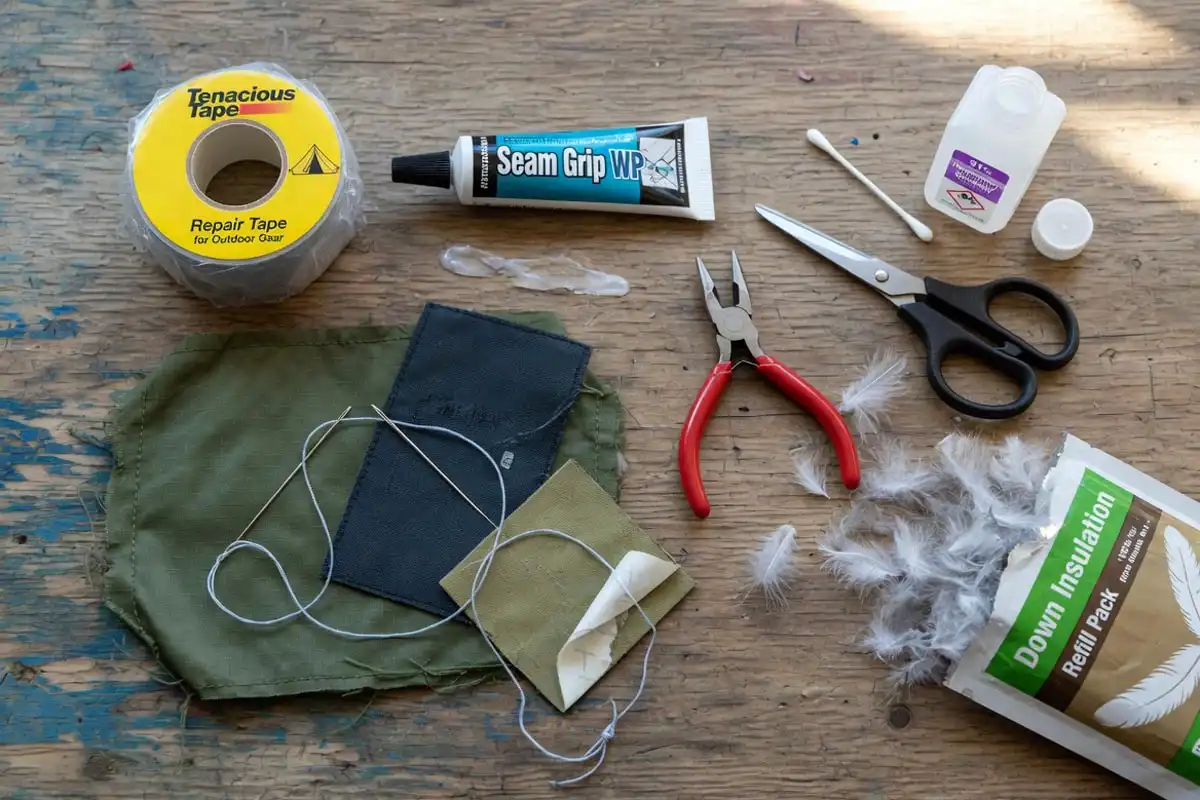
Here is the kit I carry on every trip:
- Ripstop nylon repair tape (Tenacious Tape or equivalent)
- Fabric patches in matching denier weight
- Seam Grip WP or silicone sealant
- Zipper repair kit with sliders in #5 and #8 sizes
- Down or PrimaLoft insulation refill (2 to 4 grams per cold spot)
- Sharp scissors, sewing needle, and nylon thread
- Rubbing alcohol and a clean cloth
- Small pliers for zipper work
Penn State Extension publishes a helpful overview of textile fiber care that applies well to outdoor gear fabrics.
How to Repair a Sleeping Bag Step by Step
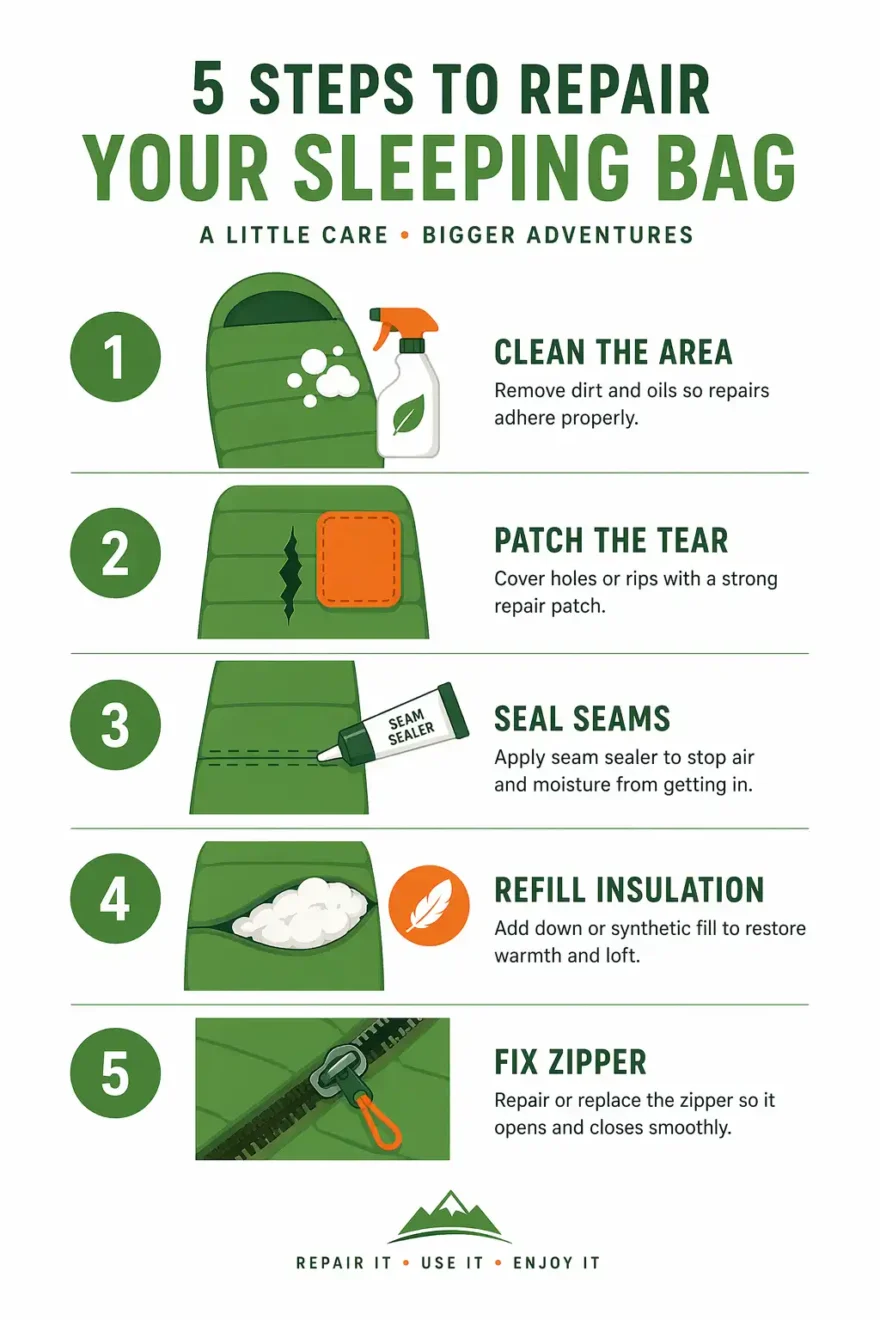
Follow these five steps in order. Skipping a step leads to repeat damage within weeks.
Step 1: Clean the Damaged Area
Wipe the tear with a cloth dampened in rubbing alcohol. The alcohol removes oils, dirt, and body salts. Let the fabric dry for 10 minutes. Patches and tape need a clean surface to bond. For full-bag cleaning before a large repair, follow the process in washing a sleeping bag without ruining the insulation.
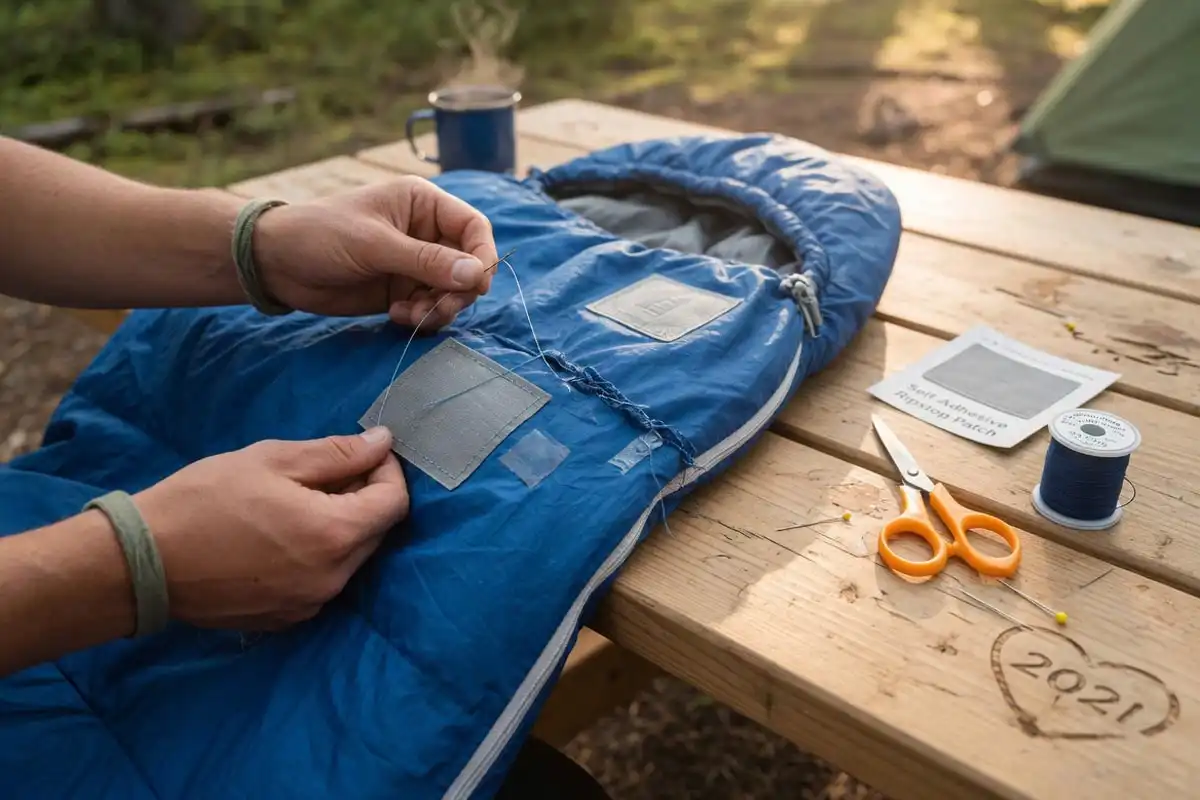
Step 2: Patch Small Fabric Tears
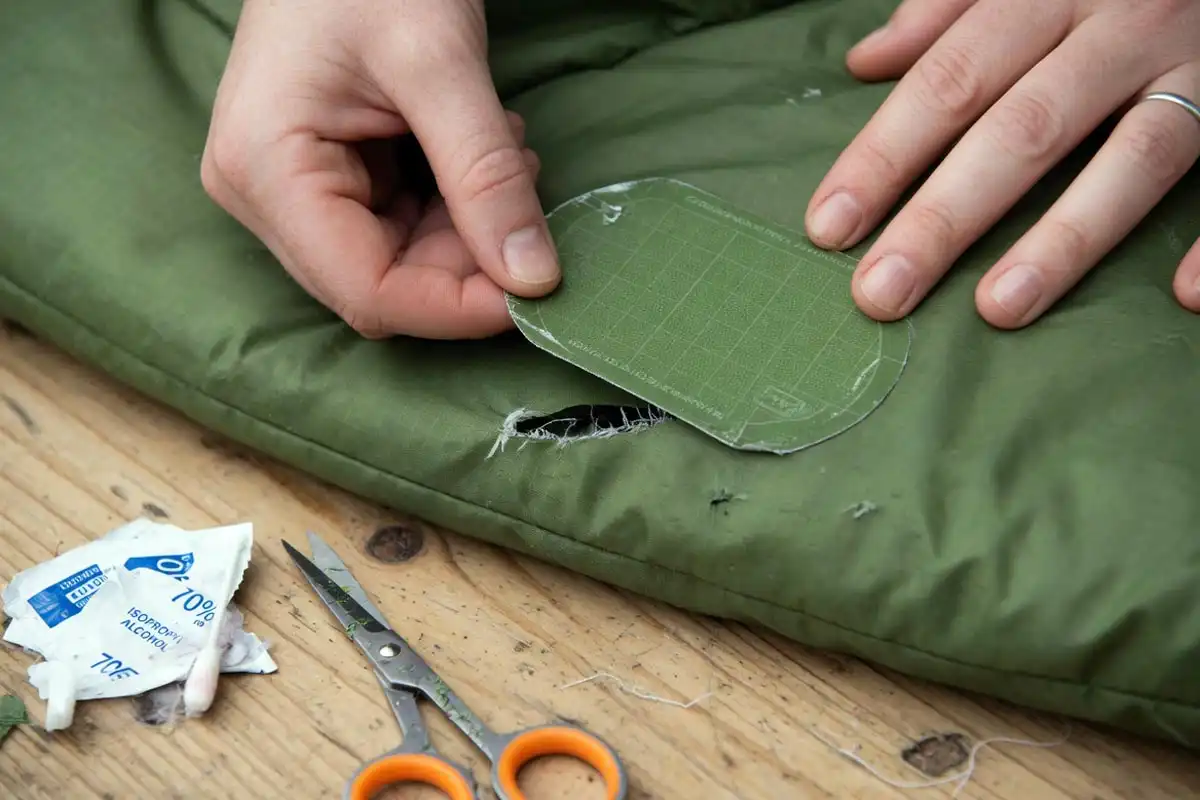
Cut a repair tape piece that extends 1 inch past the tear on all sides. Round the corners to prevent peeling. Press the tape flat, then rub firmly for 30 seconds. For tears longer than 3 inches, apply tape to both sides of the shell. The bond sets within 24 hours at room temperature.
Step 3: Fix Seam Leaks
Turn the bag inside out to expose the seam. Apply a thin line of Seam Grip WP along the stitching. Use a toothpick to spread the sealant 1/4 inch on each side. Let it cure for 8 hours. Seam Grip stays flexible down to -40°F and resists washing. I use this same method on tent seams, which I covered in my post on waterproofing a tent that has started leaking.
Step 4: Replace Lost Insulation
Down loss appears as flat, cold sections across a baffle. Open the baffle seam with a seam ripper, creating a 2-inch gap. Stuff 2 to 4 grams of matching down through the opening. Use a chopstick to push the down into the corners. Hand-stitch the seam closed using a ladder stitch. For synthetic bags, cut a PrimaLoft sheet to match the baffle shape before inserting.
Step 5: Repair the Zipper
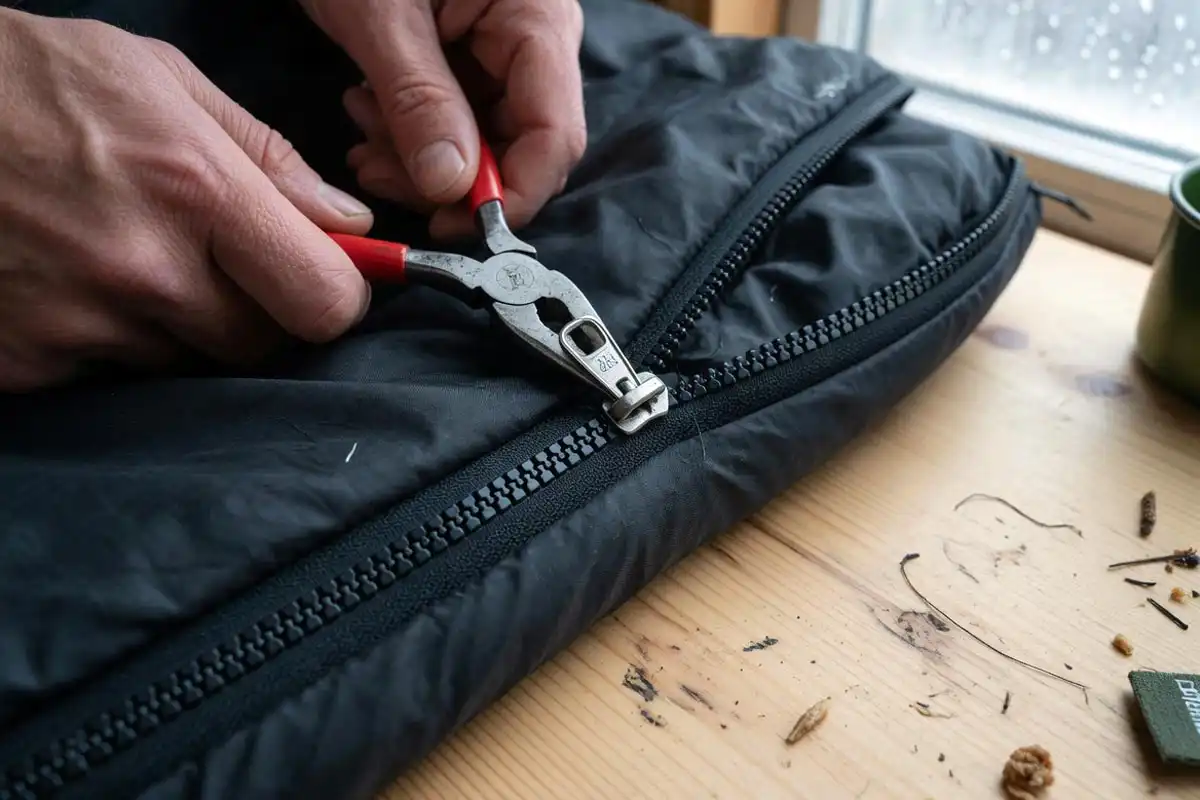
Most zipper failures come from a worn slider, not broken teeth. Squeeze the slider gently with pliers to tighten its grip. Test by zipping up 12 inches. If the teeth separate behind the slider, replace the slider with a matching size. Zipper teeth missing more than three in a row need a full track replacement, which I handle the same way as in tent zipper breaks at camp.
Troubleshooting Common Repair Problems
Repair tape lifts at the edges: The fabric still held oils. Re-clean with alcohol and apply fresh tape. Press a warm spoon over the edges for 20 seconds to reset the bond.
Seam sealant stays tacky after 12 hours: The air was too humid or too cold. Move the bag to a dry room at 65°F to 75°F. Cure time extends in high moisture.
Down keeps escaping after the repair: The baffle stitch gap stayed too large. Tighten the ladder stitch to 8 passes per inch.
Zipper still splits after a slider fix: The slider is worn past repair. Replace it with a new YKK slider matched to the zipper number stamped on the back.
Mistakes to Avoid When Repairing a Sleeping Bag
- Using duct tape on shell fabric. The adhesive breaks down and stains the nylon permanently.
- Washing the bag before patching. Water weakens the existing tear and spreads loose down.
- Over-stuffing a baffle. Extra insulation reduces loft and creates cold spots at the seam line.
- Skipping the alcohol clean. Oils prevent any adhesive from bonding.
- Using a metal iron on the shell. Heat melts ripstop nylon around 275°F.
Safety and Care Tips After the Repair
Store the bag in a large cotton sack, not its compression stuff sack. Compression flattens insulation over weeks. The National Park Service offers guidance on camping gear and backcountry basics that supports longer equipment life in variable conditions.
Hang-dry the bag for 24 hours before the next trip. Inspect every patch before packing. A repaired bag loses 2 to 5°F of warmth rating, so plan your next trip with that in mind. For cold-weather nights, I follow the methods in staying warm in a tent.
FAQs about Fix a Sleeping Bag
Can I repair a sleeping bag at camp without tools?
How long does a repaired sleeping bag last?
Does repairing a down sleeping bag lower its warmth rating?
Can I use fabric glue instead of repair tape?
What if down keeps leaking through the shell fabric?
How much does sleeping bag repair cost?
Last Notes
A torn sleeping bag does not mean the end of the bag. Most damage repairs with $10 in materials and 30 minutes of work. Clean the area, match the patch to the damage type, and cure the adhesive before packing. Keep a small repair kit in your pack year-round. The bag you save today still keeps you warm five seasons from now.